


SHOP TALK: Some Things Just Take Time
- Oct 28, 2016
- 7 min read
Updated: Oct 30, 2020
In the high-tech, fast paced world we live in today, people have grown accustomed to getting what they want, when they want it! Instant gratification is the name of this new game, and technology has enabled us to shop online, in the convenience of our homes, any time of the day or night. With the added luxury of next day shipping delivering packages directly to our doorsteps, there’s really no need for anyone to leave home and drive to a store. I myself am grateful to have this convenience and take advantage of it on a weekly basis for my custom shop business. I could go on and on citing many examples of how fast food, fast coffee, mega stores and smart phones have increased consumption levels, but in the spirit of being a gearhead, I will do my best to focus on what truly matters...our cars!
Another modern convenience that I’ve grown fond of is satellite TV. I am the consummate student / knowledge-junkie and love the vast assortment of gearhead shows that grace my TV screen. Some of these shows have incredibly gifted mechanics, fabricators, and painters that make everything look so easy. They also manage to finish building a complete show car in a one-hour episode. While this makes a TV show fun to watch, it has also programmed the average car enthusiast to think everything is easy, and that it only takes a few hours to assemble a car. I watch numerous programs that complete restorations for major events like SEMA or for a famous customer in only one week’s time. Having recently completed three of a long list of upgrades I’ve made to my car, I thought about the amount of “real-world time” it takes to perform upgrades to a show car. What would have taken less than an hour in “TV time” to complete, has taken me six months. That reality became the inspiration for this article.
EASY DOESN’T ALWAYS MEAN FAST

Just the other day I was working on my car that I have been diligently taking to the next level since May. I was lying on my back under the car, designing how and where I was going to mount the new fuel cell, fuel pump, filters, and fuel lines. My wife brought me something to drink on her way out grocery shopping and asked what I was working on. After boring her with my vision for how I needed to fabricate custom straps to hold the fuel cell and how the fuel pump bracket I designed in my head needs to keep the pump lower than the sump in order to keep the lines gravity fed, she quickly stopped me and said, "have fun" and went on her way. A little over two hours later she returned home and found me in the same position she left me in. "How's it going?" she asked. I went into another monologue of what my challenges were, and how I planned to conquer them and was once again cut short with, "have fun." An hour or so later my wonderful wife came out to the shop to bring me some lunch and yes she found me in the same spot. This time she asked me to show her what I built, and I had nothing to show her other than a few pictures I drew and a list of very detailed measurements and notes.
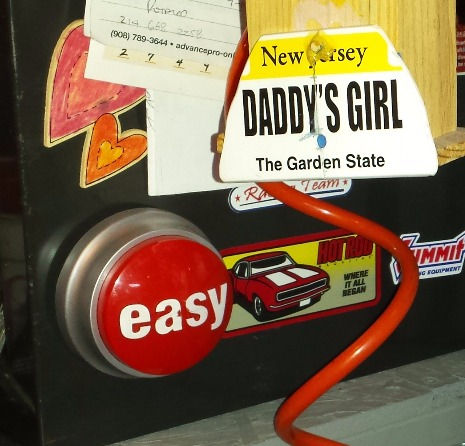
By the end of the day, though, I fabricated the fuel cell mounting straps and test fit the new design. I also fabricated the aluminum bracket that holds the Aeromotive A-1000 fuel pump and a pre and post filter. With the proper fittings that were delivered overnight to me, I was able to connect all of those parts to the bracket and perform another test fit. I took some pictures, hit my red "Easy" button, cleaned up, and went in the house. My wife stopped me before I took my shoes off and in the true spirit of being a supportive spouse asked me to show her what I built today. I took her in the shop and showed her a multi-colored fuel cell hanging strap that I made from scraps of metal I had laying around. I also showed her a 6"x14" piece of 1/4" aluminum that I cut to match the contour of the fuel pump, and drilled and tapped both to hang on the center frame rail to secure to the pump and filter assembly. She was very impressed with how I took pieces of metal and custom made them with my own hands. She was however confused why it wasn't painted and hung on the car after spending an entire day working in the shop. I then went on to explain that the metal had to be prepped before paint. I had to grind the welds and make them smooth, then sand the surface, then clean the surface, then prime it, sand again, paint, sand again, paint again and wait for each coat of paint to dry. She replied with, "Oh I understand. The car shows you watch make it look so easy." While it may seem easy, SOME THINGS JUST TAKE TIME!


THERE IS NO SHORTCUT TO THE RIGHT WAY
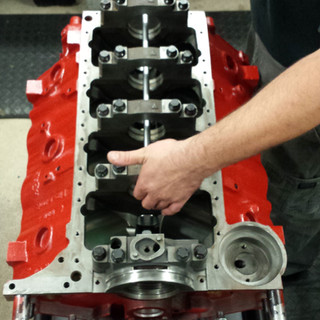
Another great example of something I just went through is putting a crankshaft in a block for re-assembly. The average do-it-yourselfer would think it is as simple as rotating the engine stand upside down, install a new set of main bearings, apply some assembly lube, place the crankshaft into its home, and torque the main caps to spec. This entire procedure can be done within ten minutes…right? After spending a day putting a crankshaft in my 572 Merlin Big Block with master engine builder Jason Leindecker, I was enlightened on just how time consuming doing things the right way actually is. I will share the steps with you, so you can appreciate your local machine shop and engine guru just a little bit more.
Once the crankshaft is polished and balanced it is ready to begin the process of installing it. The first step is to measure the journals for size, followed by measuring the rod journals for size. The journals then need to be measured for taper from front to back and ensure they are within specs. Now it is time to install and torque the main caps and check the main housing bore, vertical clearance, and check the horizontal / parting line measurement. You then have to remove all of the main caps. Each bearing shell now needs to be measured for thickness consistency. You then need to place the bearings in the block and re-torque the main caps and set a dial bore gauge to the main journal size. Check each individual main bore very carefully for bearing clearance. Be sure to check / create the thrust bearing clearance and adjust if necessary. It is now time to once again remove the main caps and remove the bearings and clean them in lacquer thinner or an equivalent solvent. Reinstall and lube the bearings and install the rear main seal. You can finally place the long awaited crankshaft into the journals and install the main caps, and torque them one final time to spec. Before you can say you are finished you have to seat the thrust bearing and rotate and check the rotating assembly for binding. If all of this was done with attention to detail, the entire process should take between one and a half to two hours to complete.
When you are spending your hard earned money building the heartbeat and life source of your pride and joy, do want the crankshaft to simply be put back into the block, or would you rather have it measured and re-measured every step of the way and done correctly? So once again, I hope I’ve made the case for why SOME THINGS JUST TAKE TIME!


THE ROAD TO PERFECTION IS NOT A SHORT ONE
I recently made a decision to hide all of the wires in my engine bay and give it a fresh coat of paint. After a long staring session and plotting out every move, I first removed the inner fenders and drilled the holes that all of the wires / plumbing would be re-routed to. I then put my welding helmet on, took out a piece of sheet metal and air shears and filled in every hole in the entire engine bay and firewall that was not being used. Once the welding was done, I needed to grind all of the welds flat. This process took an entire day to accomplish and the engine bay looked even worse than before I started the "so called" improvement. By the grace of God, and a referral from a friend, I found an extremely talented painter who was willing to paint my engine bay and fix the paint on my car in exchange for my wiring work on a classic GTO for one of his customers. I knew that I needed to scuff the surface of the engine bay before he could paint it, so I broke out the sandpaper and a Scotch-Brite pad, and spent a little over an hour prepping the surface. I blew out all of the dust and loaded up the car to take to Matt's shop for him to work his magic on. His first response was, "this is no where near ready to paint!" He instructed me on how the surface needed to look and gave me a stack of Scotch-Brite pads and a grinder with a sanding disc on it. Two hours later he gave me the thumbs up and told me to wipe EVERY inch of the surface with a solvent he gave me. The car then needed to be completely taped and covered to avoid ANY over-spray on not just the exterior but on my freshly painted under carriage and frame. Once in the paint booth, the engine bay got spot primed, followed by three coats of red and two coats of clear. Was this a bit excessive for an engine bay? Why not simply do a little de-greasing and light sanding, followed by two coats of the finest rattle can enamel like the vast majority of gearheads do? My answer is simple. When you invest over $18,000 into an engine making it a bullet-proof beauty queen, you don't cut corners to save time. To do it the right way, one has to remember that SOME THINGS JUST TAKE TIME!


There are endless examples that illustrate the amount of time it takes to build things correctly, and if you are reading this article, chances are you fully understand the complexity of engineering, mechanics, and fabrication. If you’re a diehard gearhead like me, you’ll probably never stop watching your favorite TV shows that squeeze months of work into a single one-hour episode. Despite the luxury of next day shipping, though, we all know there simply is no way to cut the time it takes to correctly plot out a project, yet alone complete it. So be sure to give your favorite mechanic, fabricator, engine builder, wiring genius, or auto body guru a heartfelt thank you, and remember to allow them the time to make your vision a reality. Every time I find myself getting impatient, I am reminded of my Dad’s lifelong motto, which still holds true today, "no job too big or small, do it right or don't do it at all."
Until next time…keep wrenching,
JT


Comments