


UNDER THE HOOD: Latest News From Project Big Red
- Mar 23, 2018
- 36 min read
Updated: Feb 24, 2023
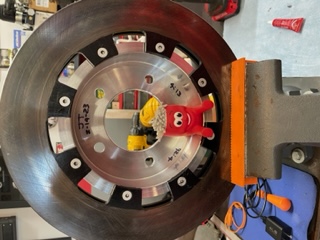
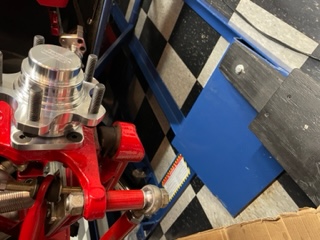
February 9th-17th, 2023: In an effort to move the front wheels in deeper, we extinguished all possibilities. The wheel company did not offer a back spacing that would work with our application, nor were they willing to help us at all! We then searched for who made the best low drag hubs for the 4th gen Camaro. All of our research led us to Aerospace Components. Not only do they make hubs that will fit a stock 4th gen, they were WILLING to make us a custom set that brought the wheel in where we wanted it. All while still making it work with our existing Aerospace Components front brakes. After a ton of precise measurements and numerous back and forth emails with their engineering department, they felt comfortable making this custom piece work for us. I could not be any happier with the finished product and with the exceptional customer service that Aerospace Components demonstrated throughout the entire process. They are truly a class act!


January 21st, 2023: While changing spark plugs on Big Red, I decided to dig down deep inside the engine bay and remove the steering linkage and give it a fresh new paint job. It gets beat up during the year from dropping the header and changing plugs. Boy does she look good again! Check out my home made spark plug socket.


December 28th, 2022: This upgrade was ABSOLUTELY ESSENTIAL! Clear View Filtration makes amazing remote oil filters that can accommodate all of your oil pressure needs. Read my feature article on the product and the install. Here are some teaser photos of the upgrade. Check out the Feature Article.


April 14th, 2022: It is not a good feeling when you pull into the water box and your line lock doesn't work, then stage your car and your trans brake doesn't work either. When I got home I ripped apart the dash and began troubleshooting the problem. It ended up that the wires in the beautiful leather wrapped steering wheel broke apart. I had to cut the leather back and make the repair. I then repaired the leather and put everything back together.


June 12th, 2021 - February 11 2022: I witnessed a friends car burn to the ground after making a pass. It happened so fast that the safety crew could not stop the fire from consuming the entire car. Thank God he was okay, but I made the decision that my small roll cage mounted handheld fire extinguisher was not enough for me. I purchased a 6 nozzle fire suppression kit and installed it in the old girl. The project took 7 month to complete because a part was back ordered. I was able to fabricate a bracket to get it working immediately. Check out my article titled SAFETY FIRST. I wrote all about this.


April 18th, 2021: After a lot of testing and math fun with a rear end ratio calculator, It was time to change the ratio in our Dana 60. All of my testing and research was confirmed by a 5 minute talk with the legend Mr. Dan Fletcher. He asked a series of questions and based on my answers, and had the same ratio just from the knowledge in his brain. I am happy to say that all of this work paid off.


June 17th, 2020: It was time to make a few upgrades and help keep our Rossler built Turbo 400 a lot cooler. I installed a new DeRale 16 row cooler with a 650cfm fan, and a new aluminum deep slotted trans pan. A ton of fabrication had to happen to make this work. The new cooler was significantly larger than the old one and to top it off, there was no room for it. With the help of some creative brackets and home engineering I was able to fit it. The new trans pan had to be heavily modified to accommodate the overflow tank and temp sensor. I finished the job off with a custom little air scoop that covers and hides the cooler. It was extremely stressful cutting, grinding, and welding on a completely finished car. Thank God I was super careful and had no "oops" happen.


June 15th, 2020: We contacted the super friendly people over at RPM Performance Data Loggers and ordered a new transmission temperature sensor and cable kit to add to our data logger. Randy sent over a set of easy to follow directions on how to wire the cable, program the data logger to read the new sensor, and program the digital dash to read the data logger. I have become a data junkie and love seeing everything displayed on my laptop. Special thanks to Randy at RPM for all of his help and making this upgrade and install extremely easy.


March 5th, 2020: We are proud to introduce our new Big Red T-Shirt and Hat designs. The super talented people over at Konstant Designs did a great job bringing Big Red to life on that shirt. If you are interested in purchasing a T-Shirt, Long Sleeve Shirt, Hoodie, Hat or Beanie shoot us an email at editor@908motormag.com


February 17th, 2020: I finally found the time to install the new springs. We went with a 50lb heavier spring and 2 1/2" longer. We will definitely not get any more coil bind after launching. Hoping to get a little more preload and weight transfer as well.


July 13th-14th, 2019: We had a great time at the Menards Chevy Show. Big Red won Best Pro Street and Top 10 Raceway Award.


June 16th, 2019: The new Billet Specialties Wheels look AMAZING! Check out the Parts Counter column for our feature on them. I can't believe how much of a difference they make in changing the look of the car.


June 16th, 2019: After a lot of research we finally found the ONLY rear brake kit that will fit with the new Billet Specialties wheels we ordered. Thank God it is made by Strange which is known for their super high quality racing parts. This new kit was so easy to install and very well designed. Big Red should be able to stop a lot better now. Some of those shut down areas are way too short for no parachute,


June 15th, 2019: Big Red officially left the body shop for the last time today. We fitted the hood and fixed a few gap issues. It is hard to believe that she went from rags to riches. It was a long journey and a lot of hard work. I lost all of my fingerprints from sanding so much. Here is what she looked like when she left the shop.


April 20th, 2019: Well Big Red is finally painted, wet sanded, buffed, and polished. Matt at Convenience Collision did an amazing job showing why is the premier painter in the area. If all goes well I am bringing her back home today to start re-assembly. I will share more pics with you when she is back in my shop. Here are a few for now.


October 7th, 2018: I got the official word from Matt at Convenience Collision to start taking Big Red apart. We are bringing the parts in stages so she gets to stay in my shop for as long as possible and free up room in Matt's shop. Here are some pics of the process. More to follow.


July 29th, 2018: We loaded up Big Red and attended the Mt. Lake Car Show and she won Best Race Car. This is a REALLY cool show and is well run. It doesn't get any better than a day with my wife and daughter, and Big Red lakeside with hundreds of cool cars and fellow gearheads.


July 20th-22nd, 2018: After a little abuse at the Menards Show and our favorite racing spot here in NJ, we found out that the CryO2 tube on the passenger side settled in was hitting the alternator fan. After looking at the situation for an hour or so and trying every possible way to make a bracket, I decided to make it as simple as possible. I made a cardboard template and transferred it to the aluminum and did my thing bending and drilling. After a quick polish, I mounted one end to the engine bay and the other to the clamp that holds the filter to the tube. It was simple and clean and most importantly INVISIBLE to the front of the car.

July 13th-15th, 2018: We packed up the truck and hauler and took Big Red to the Menards Chevy Show at Maplegrove Raceway in Reading, PA. The old girl was well received and won Best In Class. Our hats go off to Brian and his crew for running an excellent event as always and for Maplegrove Raceway for hosting this prestigious event. I had a great time with my family and my little brother even joined us on this trip. It was great to see so many old friends and enjoy 3 days of gearhead utopia. Special thanks to all of our sponsors for believing in us and making this happen. We are grateful for your support and will continue to spread the word wherever we go.


April 20th-May 15th, 2018: I bit the bullet and completely redesigned the cooling system on Big Red. After a hard day at the track or an even longer cruise, she has the tendency to get a little warm. After a lot of research, I found out that AFCO makes a double pass radiator 80101NDP that is the same dimensions as my old one. The double pass technology should be the missing element I am looking for. The only problem with this plan is that the upper inlet is on the opposite side, and the new radiator has a filler cap and overflow port on it. I was really not looking forward to anymore fab work on a finished and tweaked car, but I have no choice. Thankfully Jegs makes a universal intake port that can be flipped for either left or right side application. It comes already set-up for my temp sensor and ports for the lines that cool the back side of my Brodix heads. The next obstacle was that the old radiator did not have a filler cap. So I essentially made the new radiator filling port useless by capping off the overflow port and putting a 25-27psi cap on it. Since steam rises, I will use the port on the intake as my filling port and cap it with a 19-21psi cap. (raising the pressure of the system considerably raises the boiling point) AFCO radiators are pressure tested to 30psi and after speaking with them, they assured me that many of their racers successfully run 25-28psi. I had to modify the top support and make room to accommodate the filling port. Since I had the top support off, I stopped by my buddy Matt's shop and had him buff it to a brand new lustre. I was able to fit everything in that tight little space and keep everything looking as tweaked and professional as it used to. It passed the driveway temp and pressure check, but I ran out of time and good weather to do some pavement pounding and see she how she really works. On a positive note, it was really hard trying to get to operating temperature while idling in my driveway. This was NEVER the case with the old radiator and my 572 CI beast.


February 1st, 2018: It's been a while since we updated all of you about Big Red. I bought her a car cover for Christmas and she has been resting nicely in the shop under her new blanket. And yes, I start her up at least once a month to keep my heart beating and the carb clean.
I am proud to announce that RPM Magazine did an 11 page feature story on her with 21 pictures taken by the famous Rick Belden. She was featured in the January 2018 issue and even has a cover photo! Special thanks to everyone at RPM for believing in my car and making a lifelong dream come true.
September 2nd-19th, 2017: After hearing a disturbing sound coming from the rear at high speeds, I decided it was time to take her out and see what was going on. Just to play it safe, a complete rebuild was in order. I installed new Timken bearings and races. A new Strange Diff and a bigger set of Strange 5:13 gears. The only thing I re-used was the Moser axles as those and the end bearings were just installed over the winter. Since I had the rear out of the car, I figured I might as well give it and the rest of the rear suspension a fresh coat of paint. The Dana 60 might be old school, but this one has the best of modern parts in it. Finding the time to work on your own car is ALWAYS a challenge. There was a lot of late nights in this baby. On another note, I now own every tool you could possibly need to rebuild a Dana 60. We are back to green flag racing!


August 19th, 2017: We took Big Red and our 908 Hauler to the Cops n Rodders Car Show to benefit Children with cancer. We had a great day meeting so many awesome people. Big Red had quite the crowd during a few scheduled start up sessions. She won another award.

July 30th, 2017: We entered Big Red in the Mt. Lake Car show and won 1st place in the Race Car Class. There were some really nice cars on site and a few awesome race car entries. As always I enjoyed talking with everyone about the project and telling them about all of our sponsors and the benefits of their products. I highly recommend this show to everyone. Good people, amazing lakeside scenery, and well run. Fun for the whole family.

July 13th-16th, 2017: I decided that since Big Red is only a virgin once, I was going to enter her into the Menards Chevy Show at Maple Grove Raceway. She was well received and made quite a splash for her debut showing. We thank all of our new friends for helping us that weekend and showing us the ropes. Special thanks to all of our sponsors for making this happen. We are grateful for your support and will continue to spread the word wherever we go.


July 6th, 2017: Special thanks to Mike at E-Town Raceway Park for opening up his beautiful facility for our photo shoot of Big Red. The weather was horrible and it rained 99% of the time we were there. We shot most of the pics under their iconic tower because there was NO way my baby was getting wet yet. The rain stopped just long enough for my brother and I to set up on the track and get the picture I was hoping for. We will be attending some car shows and then its time to test all of the new parts for our amazing sponsors. Here is a preview of the photo shoot for our upcoming feature.

June 25th - July 1st, 2017: The LAST pieces of the puzzle were put into place. I finally found the the elusive hood strut brackets from Brocks Camaro in Columbia, South Carolina. Check out his e-bay store if you have a Camaro or Firebird. I had to modify the brackets to fit my fiberglass hood. After a bending, cutting, and grinding, I sanded and painted them to look new. Thanks to VFN Fiberglass for sending me the lower pressure hood struts so we don't crack the hood trying to close it. It is so good to see the hood open without using a prop bar.


June 15th, 2017: I brought Big Red to Funk Signs to have the front and rear rally stripes put on. Special thanks to Joe at Funk Signs for taking his time to make sure these turned out great. We worked all day together and was able to do what other decal shops said would be near impossible because of the size of the cowl. Joe made it look easy as this job transformed right in front of my eyes. If you are looking for a great job by someone who pays close attention to detail, Joe at Funk Signs is your guy. He is certainly the only one we will ever go to!


June 8th, 2017: The engine is finally COMLETE and is a piece of art!. I plumbed the Design Engineering CryO2 Air Bulbs into the Spectre cold air pipes. The solenoid sends CO2 to the bulb on the right first then passes through the -4 braided line and feeds the other bulb before venting out under the car. I also made a new upper radiator support out of aluminum. We will be starting it up again this weekend and take a short cruise with her. We are just waiting for the decal shop to schedule us in and lay down the rally stripes on the hood. It is hard to believe that all of the the work is coming to an end. It is time to schedule a photo shoot and capture the beauty of this beast before we get her dirty at the track.


May 27th - 30th, 2017: Putting the interior back together was an internal milestone for me. I was very anxious to test all of the electronics that I labored over during the winter. There are so many things that get controlled and monitored. Every piece was custom cut and painted. I am happy to say that everything worked perfectly. The new NRG quick release and steering wheel look amazing. It is finally beginning to look like a finished car again. The only thing left in the interior is to put the Kirkey Racing Seats in and the G-Force Safety harnesses.


May 27th - 30th, 2017: It is time to get the interior back together. I was very happy with the way the center gauge cluster came out. I was able to find a stock piece on e-bay and began planning how I was going to fit the RPM Performance digital data logger dash, Painless switch panel, Autometer gauge cluster and warning lights in such a small spot. After a lot of measuring and mocking up parts, I took out the air saw and began cutting things up.


May 25, 2017: Today I mounted the transmission overflow tank. This handy little part will not only keep everything clean under the car, but it will keep transmission fluid off of the rear tires. Had to cut a hole in the tranny tunnel to access the vent port and thread in the AN fitting. That was no problem, just had to make another patch panel and seal it back up.


May 17th-18th, 2017: There is no better way to ruin a perfect hood than to drill some pilot holes in it to see if your hours of measuring and planning actually worked. Well there is a better way and that is to take an air saw to those pilot holes and join them together. Special thanks to my gearhead buddy Shawn for helping with this "all-nighter." This is not something you want to attempt by yourself if you are an OCD guy like me. Not to mention that we took the hood on and off over 40 times. I used the blue tape to not only protect the finish on the highly polished tubes, but to chart the progress and lay out a grid to see where each next cut would be. There were 18-22 different cuts on each side. I am so happy with the way it turned out and can't thank Shawn enough for his help and calming through the entire process. TEAMWORK!


May 1st, 2017: With the exception of the CryO2 Air Bulb Chillers the engine is almost COMPLETE. Special thanks to Guy at Spectre Performance for his help in designing the dual plenum and tube layout for us. I am really happy with how everything turned out. All of the countless hours paying attention to the smallest details paid off. Now I have to try to make the hood fit over this beast.


April 28th, 2017: Had an EXTREMELY productive day in the shop. I was able to mount the Mike Norris oil catch can / separator that I got from the great people at Scoggin Dickey. Thanks to some detailed measurements earlier in the week, the location I chose was perfect. I made all of the braided lines to connect the oil catch can to the carb and breather. I had to drill and tap the breather to accommodate the 1/8" NPT to -6 AN adapter. I also made the braided lines to connect the radiator overflow tank to the inlet on the intake. I installed the radiator and used my Nutsert gun to mount the upper radiator support. The new braided radiator hoses from Spectre Performance worked perfect and added a nice touch to the engine bay. Since I was in the "making braided line mode" I also made the 2 fuel lines from the Aeromotive regulator to the Pro Systems Carburetor.


April 6th, 2017: I was able to make the alternator brackets, paint them, and wire and mount the alternator. The new Powermaster Alternator looks fantastic. I also installed the front engine plate today. I needed to mock up the CryO2 Cold Air Tubes so I could get some measurements. We are so excited, It is going to look amazing.


April 1st-2nd, 2017: The long awaited day has come. The engine and transmission our now back in its home! Special thanks to my gearhead buddy Shawn for flying in from Florida just to share this special event and lend me a hand. A special thanks to my friends Marty and Zack for letting us use their shop and make this install so much easier. We were able to install the converter and check for all the proper clearances as well as the mid engine plate and transmission. Everything was right on the numbers we hoped for. The freshly ceramic coated headers from GSD Coatings were then installed and helped make this entire beast look like a piece of art.


Once the engine, tranny, and tubular k-member were safely back in, we left my buddies shop and headed back to my own shop to begin reconstruction. We installed and plumbed the trans cooler, front air dam boxes, secured the mid engine plate, and got side-tracked fabricating a tow hook off the front of the car. This will keep me off of my back when I go to winch her in and out of the hauler. Like I wrote about in a "Shop Talk" Its the simple things that we tend to overlook, and starting off a day at the track or a car show without getting wet and dirty is a MAJOR plus. I am looking forward to plugging away at the rest of my checklist and finishing this project and sharing it with all of you. I am also looking forward to re-paying the favor and helping my buddy Shawn with some electrical work on his hot rod.
March 25th, 2017: I had some time to finish up some loose ends today. I was able to get the CO2 regulator mounted in an upright and centered position with the help of the creative use of some brass fittings. There was no way I was going to have the regulator mounted upside down or to the side of the tank. I also finished wiring the alternator fuse through the firewall in my quest to keep the engine bay clean and clutter free. The engine and tranny go in NEXT WEEK! I can't wait! Stay posted the engine install pics will be here soon.


March 15th, 2017: I wanted to give a special "shout-out" to a fellow gearhead that answered a distress call I put out on Instagram. I sent in a picture and asked the world of gearheads if anyone could help me find some parts that I could not find on my own. I needed a piece of plasic that separates the headlights and adds a finishing touch to the way they look. I also needed a bracket that gets mounted to the hood that holds the gas strut to the shock tower. Not only did @nickjp99 tell me he would look around for me, but he actually found the headlight separator. To top it off he had it shipped to me from across the country and would not take a penny in the process. Just when you lose all hope in humanity the gearhead community shows up and gives you hope again. We thank Nick and all of the other people who put aside their busy lives to help someone in need.

March 10th, 2017: It has been a long winter. We got a ton of little detail work done on the car since our last entry. We are scheduled to put the drivetrain back in April 1st-2nd. We will keep you up to date with detailed posts and pictures. We can't wait to get this beast on the road again!
Be sure to check us out on Instagram (908motormag) we will post all of the pictures of the final assembly.
January 12th, 2017: With all of the wiring complete, I decided it was time to check if everything worked properly with the new data logger. It was very cool to see that thing light up and come to life for the first time. Next step is to tuck and tie everything up and make it clean. Can't wait to test all of the functions and make some passes. We are definitely ready to put the drive train back in and get another step closer to firing it up!


December 29th-31st: The fuel system has been COMPLETELY rebuilt with the finest parts available. Special thanks to Aeromotive and RCI for providing us with their incredible products. Back in October I shared with you some pictures of the custom straps I made to hang the fuel cell now check out the finished product! I am so happy with how it turned out. I used the Aeromotive A-1000 Fuel Pump and Regulator along with their pre and post filters. Russell Pro Flex fuel lines and Jegs fittings connect everything to the custom made RCI fuel cell. RCI did an amazing job at taking the drawing and specs I sent to them and making this beautiful cell.


December 17th-18th: Project Big Red is FINALLY ready to put the engine and transmission back in! I finished up some wiring in the interior and connected the Optima Red Top to the new power wires I just installed and actually tested all of the circuits. I am happy to report that everything worked perfectly with the exception of a bad flasher relay. It was very encouraging to see all of that hard work come to life and show me signs of completion.
December 10th-13th: I ran a brand new 1/0 master power wire from the engine bay power lug to one side of the rear kill switch. I then made a new main power positive battery 1/0 wire from the positive side of the battery to the other side of the rear kill switch and shared that lug with a new master alternator 2 gauge wire that gets connected to a 150 amp fuse block in the engine bay and then to the alternator. I ran all of the new wires in a Vulcan Thermal Shield from the great people at Performance Plus Connection.
November 24th-27th: After finishing up a few cars for customers and recovering from a few days of crazy back pain, I FINALLY had some time to get some more work done on Big Red. I am almost ready to put engine back in this beast. I have the complete Aeromotive fuel system finished. I hung the absolutely beautiful new RCI fuel cell with the custom straps I made, mounted the fuel pump to my freshly made bracket, made all of the lines and ran them in a Vulcan Thermal Sleeve, connected the filters, and hung the regulator.
I ran the wiring harness I made that connects the back of the car to the front in a Vulcan Thermal Sleeve and mounted it to the frame. I also ran the rear brake line and the CO2 line into the engine bay. I mounted and wired the bump switch in the engine bay along with running the wires for the water pump, fans, line lock, CO2 solenoids, water temp sensors, and alternator exciter wire.
Lastly, I mounted the G-Force Accelerometer, Line lock solenoid, and the CO2 solenoid and connected all of the braided lines to them. I really needed to get all of that done and into the engine bay before I get the 572 back in. Once that beast is in place there is just no room whatsoever to do the kind of detail work I expect from myself. I have a few small things to finish up before I schedule my buddy Shawn to come and help me get the engine back in. I can't wait!


November 5th: I had a great time at the SEMA show. I was able to visit all of our sponsors booths and spend some time looking at all of their amazing products. It was so good to finally put a face to the fine people I talk to throughout the year. Be sure to check out our sponsor section and visit their web-sites to see for yourself. While SEMA was fun, It is good to be home. After drooling at all of the amazing cars this past week, I am looking forward to getting back to work on Big Red. By the way, did I mention that I got to hang with the legend Don "The Snake" Prudhomme? The last time I was able to talk to him I was 9 years old. He is the king of cool and will always be my favorite Hot Wheels car. #SEMA
October 28th: Big Red was given a complete make-over at Convenience Collision. Matt or as I now call him "The Paint Whisperer" and his crew did an amazing job and saved me a fortune by polishing a turd of a paint job and making her worthy of all the new upgrades. She is finally back in my shop and will undergo reconstruction surgery as soon as I am back from SEMA. Like I wrote about in this months Shop Talk column...... SOME THINGS JUST TAKE TIME!


October 24th: I brought Big Red to my friend Matt at Convenience Collision today for him to perform a final tweaking on the paint. His work is stellar so I am super excited to see it on Thursday when I pick it up. I will share the pictures with you so you can see for yourself.
October 22nd: By the grace of God I was able to spend an entire day in my own shop. I pulled the plugs from my 572 and cleaned, gapped, and put anti seize on the threads before numbering them and putting them back in their home. I also removed the distributor and rotated the cap so the coil wire faces the front of the engine. The fire wall is so close to the back of the engine that there is simply no other option. I also was able to finish the front wiring harness that my daughter and I began back on August 14th. It turned out really well and I cant wait to put it back in the car.


I finished the day off by making a much needed part that I could not buy. I needed a brake pedal plunger for my master cylinder and since everything is custom the only way to do it was make it myself. After looking at my scrap metal and seeing what kind of long bolts I had laying around, the plan came into full focus. I took a long bolt and cut the head off and milled the tip to fit in the master cylinder. I then ran a 3/8x24 die down the shaft and made the thread depth a lot longer. I cut the bolt to length and cleaned the end up again with the die. I then took a piece of steel tubing and hammered one end flat then drilled the center of it out to match the post I welded on the brake pedal after making sure my measurements and math were correct to achieve the proper pedal ratio. i welded a nut on the other end of the tubing and gave it a few coats of paint to keep things pretty. The end result was a fully adjustable brake pedal plunger.


October 17th: Check out the amazing job that Peter at GSD Coatings did on my exhaust. They look absolutely amazing! I can't wait to share the data with all of you of how much cooler the engine bay temps are. They are going to look pretty on the new engine and new engine bay.


October 13th: I wanted to share the data of a very cool test we did today on the dyno comparing a Holley 1050 cfm Dominator and a custom built Pro-Systems 4150. We were very impressed that the smaller 4150 made the following numbers:
At 3500RPM the Pro-Systems 4150 made 11hp MORE than the Dominator
At 3900RPM the Pro-Systems 4150 made 3hp LESS than the Dominator
At 4500RPM the Pro-Systems 4150 made 8hp LESS than the Dominator
At 5000RPM the Pro-Systems 4150 made 9hp LESS than the Dominator
At 5500RPM the Pro-Systems 4150 made 7hp LESS than the Dominator
At 6000RPM the Pro-Systems 4150 made 8hp LESS than the Dominator
Congratulation to Patrick James and Pro-Systems for making us such a stout product. This smaller carb will enable me to use a custom dual plenum CO2 chilled cold air intake and still fit under a 6 inch cowl. Not to mention making the engine much more streetable at a low RPM and only sacrificing 9 horsepower at 5000 RPM!
October 13th: The day has finally come. I heard Big Red roar today and it was soooo worth the wait!!! I went to Leindecker Racing Engines to meet up with the mastermind behind all of the machining on Big Red. Jason and I took a ride to Master tuner Wayne Hyrowich's dyno shop and put Big Red through a series of pulls. She sounded absolutely beautiful and thanks to Jason's genius performed flawlessly. She starts right up each time and had no issues or leaks whatsoever. In the spirit of "Heads Up Grudge Racing" and keeping things secret this is all you will get - Big Red muscled out well over 700 foot pounds of Torque before 4000 RPM. Yes, you heard me right and may I remind you that this a pump gas engine! I can't wait to feel that in the seat and see the data from the g-force accelerometer. Thanks to Wayne for sharing his vast knowledge and his dyno with us. Special thanks to Jason Leindecker for his anal attention to detail, his passion for performance, and for treating this project like it was his own. I look forward to writing a feature about him and his machine shop in the future and encourage everyone to give him a call.

October 10th-12th: I took my car to Convenience Collision to have master painter Matthew Zielenbach paint the engine bay and make her worthy of the new 572 Merlin powerplant which is a piece of art in its own right. Matt taught me the importance of proper prep work and had me completely scuff, sand, grind, and prep the entire engine bay. I learned a lot from him during my time there and enjoyed hanging out with his very talented staff. Matt was able to work his anointed talent and make the engine bay look better than the rest of the car.


October 8th: I had some time to fabricate a custom hanger for my new RCI fuel cell. I needed to make a special hoop to fit around the sump end. It came out really well and will enable me to finally hang the cell so I could begin the fab work on the fuel pump bracket that I have in my head.


October 2nd: I laid under Big Red for over 2 hours designing where and how to hang / plumb the new fuel system. Everything is brand new from the custom made RCI fuel cell to the Aeromotive A-1000 fuel pump, Aeromotive pre & post pump filters, and the Aeromotive fuel pressure regulator. There is no doubt that the 572 will be well fed. With the help of my brother, we mocked up the fuel cell and plotted out where the rest of the system will go. At the end of the day, I had nothing to show other than a detailed plan of what I need to mount everything and where it will be mounted. Most people don't understand that there are countless hours of thought and simply staring at a project before any visual progress is actually made. Please have some patience / understanding with your local fab guy or custom shop and let them be creative. After all, if it was easy you would do it yourself right?
October 1st: My younger brother came to visit this weekend and after a quick hug hello, went in the shop with me to knock some more things off of Big Red's list. I needed to put the valve cover breather baffles in the new Moroso billet valve covers but I was not happy with the baffles that came with the kit. They were designed to mount with the flat end touching the end of the valve cover thus allowing the air to vent from only one side. Because of the roller rockers and stud girdle there was simply not enough room to mount them with one end touching the valve cover. I needed another fabrication job like a hole in my head but I reminded myself that this entire project began with the mission of doing things "RIGHT."
After taking numerous measurements, I laid out a grid on the sheet metal and began cutting into shape. Once it was cut, I bent everything into shape and made my own design with a closed back end and a larger baffle area. I drilled the large 1 1/8" inch hole for the breather and installed the grommet. The finished product looks amazing and another set of hands and eyes from my brother made the job a lot more fun.


I never really had enough brake pressure despite installing a new Strange master cylinder and bolting up a set of Aerospace disk brakes out front and Wilwood disk brakes out back. I had a great, solid pedal but was not getting enough pressure. After much research and a suggestion from a friend, I took some measurements to determine the brake pedal ratio. Strange called for a 6.5:1 ratio and it had much less. So we removed the pedal and gave my brother the task of grinding away the old mounting stud. I took some very detailed measurements and needed to mount the new plunger pivot stud 1.846" inches away from the actual pedal pivot point. I made a new stud out of a grade 8 bolt and drilled it out for a cotter pin and then welded it through the pedal. After a new coat of paint she looks better than new as someone had previously hacked the pedal up trying to guess where to mount the plunger pivot. I don't know why people guess and hack when it is actually very simple math. Note to future gearheads..... PAY ATTENTION IN SCHOOL!
We finished the day by drilling out my freshly coated headers and welded a set a O2 bungs in each of them. I also filled in the mounting holes they made to hang the headers. Speaking of freshly coated headers, Pete at GSD Coatings did an amazing job not only bringing my custom headers back to life and making them look new again, but he did the entire exhaust system as well including the heat shields and clamps. This will add just one more level of anal detail to this project and I am grateful to have met him. It was a treat for me to get to spend some time with my brother and work on Big Red together. I am looking forward to Sunday and work him until he has to head home.


September 29th: I made the 4 panels to cover the transmission bolt holes in the trans tunnel and bolted them in place. I painted the calipers and mounted the caliper brackets to the rear. When the paint dried I mounted the calipers. I finished some misc wiring in the interior and took some measurements so I could hang the new rear harness in the Vulcan thermal sleeve. I took out my brake pedal so I could get a 6.5:1 ratio. I will take some measurements and do some math and then weld the new studs in place this weekend and see if it likes the correct pedal ratio better. I have a huge list to conquer this weekend and if I get it all complete I could take the car to get the engine bay painted by a pro.
September 24th-25th: I finally found the time to put Big Red's Dana 60 back together. I put new axle tube seals in and pressed in the new bearings. I took apart the Koni rear coil-overs and gave the springs a fresh coat of paint. I put the driveshaft RPM sensor in the bracket I fabbed up and adjusted it to 2.5mm from the new Mark Williams pinion yoke and collar. For the record, the Mark Williams pinion yoke IS THE EXACT size as the stock spicer yoke. When doing research on how to connect a hall sensor to a Dana 60 yoke, I came across several forums that had gearheads with the same question as me. A few of the people stated that the Williams yoke was bigger when in fact it is the same exact size. I was also surprised that everyone drilled holes in the webbing to mount their sensor bracket and was willing to risk the bracket coming loose due to vibration. I made my bracket out of 3/4" square stock and welded it directly to the webbing. While I was connecting the driveshaft RPM sensor, I also installed the linear position sensor on the rear suspension and connected them both to the data logger. The only thing left to do on the rear is to put the brakes back together again.


September 22nd: I spent a great day with master engine builder Jason Leindecker at his machine shop. Besides making a lot of progress on my 572, I always learn a lot and enjoy our time together. Jason meticulously assembled the valve train today with me. He checked every spring for its pressure, checked every push rod length and made sure the rocker geometry was correct across the tip of the valves, measured valve to piston clearance, and after making sure everything was within its correct tolerance, began to assemble the heads. The finishing touch to a great day of progress was installing the Scorpion stud girdle on top of those Big Brodix heads. It looks like we have just one more session together before we take this beast to the dyno and let her come to life. I CAN"T WAIT!


September 17th-18th: I scraped a ton of rubber off of the wheel tubs and rear area, then wire brushed and sanded the entire under carriage to prep for paint. I used rubber undercoating for the wheel tubs and all of the sheet metal under the car to deaden the noise. When the undercoating dried, I covered all of it with flat black. I also painted the frame and trans tunnel gloss black.
I pulled the Moser rear axles out because I am putting in new end bearings and seals. Since the axles were out, I pressed the wheel studs out and will replace with new ARP wheel studs. I took out the rear pinion seal and replaced it with a Yukon pinion seal. I sanded the Dana 60 and the ladder bars / z-bar set-up and put a fresh coat of paint on all of that. I also painted the rotor hub, caliper brackets, and calipers.


September 11th: Today I rolled Big Red out of the shop to give her some fresh air. Actually I wanted to be outside but had a ton of work to do on her so rolling her outside at least got me out. I fired up my MIG welder and filled in all of the holes that were not going to be used in the engine bay. It took a lot of welding and a lot of grinding but it is finished and is going to look great when it is painted. I put the word out to all of my gearhead friends and my buddy Scott answered the call and found me a set of used Jeep wheels and tires to put on the back of Big Red while I am working on it and to send it to the paint shop. The massive 33x22x15 Mickey Thompson Sportsman Pro's and Weld Wheel Pro Stars are just too nice to get damaged and the Jeep tires leave a ton of room to get in the wheel tubs.


September 9th: I went to Leindecker Racing Engines first thing in the morning to begin assembling the bottom end of Big Red. Jason balanced and polished the Scat crankshaft and had it ready for us to install today. After a series of extremely detailed measurements including: crank mains / journals, bearings, bearing clearance fully torqued, "c/c ing" the pistons, filing and gapping the rings, we were ready to start putting the rotating assembly together. The massive Comp Cam went into its freshly lubed home first. The crankshaft was placed on top of Mahle/Clevite bearings and the mains were torqued to 110 foot lbs. Jason's close attention to detail resulted in a super smooth turning crankshaft with perfect bearing clearance across the entire crank. The J&E Pistons were polished and ready to get connected to the Scat rods next. The freshly gapped rings were installed and the giant pistons were dropped into their home. Today was a great day for visual progress as the hours of research, machining, balancing, and measuring often get no credit from an impatient customer. In my case, I am most impressed by the behind the scenes anal, detail that goes into professionally building a high quality racing engine. Assembly can be done by any mechanic, but the above mentioned prep work is best left for an expert engine builder / machinist / and engine shop like Leindecker Racing engines.


September 6th: I got up extremely early and cut the front portion of the trans tunnel out to have easy access to the transmission bolts in the event I ever have to take the Rossler out or do a converter change. I will fab up a one piece cover to mount inside and secure it with my new nutsert tool.
I removed the rear wiring harness, rear brake line, and CO2 line as I am going to install the new rear harness I made, and run everything in a new Vulcan Fire Sleeve. Performance Plus Connections makes these and a host of other amazing products. The people there are extremely helpful and I urge everyone to check them out. I removed the old fuel lines and measured my new -10 supply line and -8 return line. I will run those in a new Vulcan Fire sleeve as well.
I took a wire brush and scraped all of the "burn-out" rubber from the bottom of the car in preparation for painting the chassis and complete under carriage. I had to stop here today and spend the last day off with my girls.
September 3rd: With 98% of the interior wiring complete, I switched gears and went into fabrication mode. I first removed the stock pinion yoke and installed my new billet Mark Williams yoke that is machined to have the hall sensor collar fit around it. I needed to make mounts for the Driveshaft RPM sensor and the Linear shock travel sensor. After a lot of thought and staring at my Dana 60, I used a piece of 3/4" square stock and welded a 3/4" flat stock tab to it that I had already bent 90 degrees and drilled to accommodate the sensor. I welded the square stock to the webbing on my Dana after making sure my sensor was at the required distance from the collar on the yoke. (the sensor is adjustable and I set it to the middle position before welding)
I then moved to the linear travel sensor for the rear suspension. After taking a bunch of measurements and test fitting, I made a bracket that mounts to the lower coil-over mounting bolt and connects to the bottom of the linear travel sensor. I made the top bracket and welded it to the top frame rail where the top of the coil-over is fastened.
With both sensors securely mounted I was able to finally run the cables to the sensors for a final measurement so I could send them back to RPM Performance to complete the connectors.
August 27th-29th: I spent a lot of time over the past few days re-wiring Big Red. Saturday I actually spent a full 12 hours in my shop. I am finally near completion in the interior. The power distribution board I made is working perfect and will make any future upgrades / repairs very easy. I decided where I was going to mount the data logger and ran the power wires and remote data record wires to it. I went a little overboard and wired in individual arming switches for every push button / momentary switch including the trans brake, line lock, CO2 purge, CO2 chill, and data record. I also made a separate harness for all of the trans related electronics. I am looking forward to finishing up the interior wiring then beginning the process of making a new harness for the rear of the car.
August 19th: I was so excited to see that the transmission came back today from Rossler Transmissions. They put in a new aluminum hub, replaced the tail shaft bushing, and gave it a complete "freshen-up." They put it on their dyno and told me it is ready for some serious horsepower. Thank you to all of the guys at Rossler for sharing your time and expertise.
My UPS driver dropped off the data logger, digital dash, and all of the sensors from RPM Performance today. I also got my new pinion yoke from Mark Williams. His billet Dana 60 yoke is machined to accommodate the driveshaft RPM sensor. I spent some time planning where to run the wires for the sensors and how to tie it all in to the new Power Center I designed. It is not even installed yet and I can't wait to make some passes and see the data on their awesome software. I will document the entire installation process in an upcoming article and show everyone how easy it is to bring your car into 2016 technology.
August 18th: I went to Leindecker Racing Engines and began the machine work on the Brodix heads. Jason was able to press out the bent valve guide in cylinder 1 from when the keeper broke and bent the valve. He machined all of the guides with his Sunnen Hone-All and
re-surfaced all of the valve seats for the "Big Brodie" on his Peterson TCM-25. Jason explained to me his plans for increasing the flow rate of an already massive set of heads. #moreisbetter!


August 11th-15th: I was able to spend some quality time in the shop the last few days and make some amazing progress. I designed the main power center for Big Red around a 6x12 inch piece of aluminum. I wired in a 10 lug ground buss, a 10 lug 12 volt power buss, and a 12 volt switchable buss along with relays and circuit breakers for the fuel pump, water pump, cooling fans, data logger, and CO2 solenoids. This will be mounted in the cockpit so the engine bay is free from relays and circuit breakers. It turned out so beautiful that I decided to make these for customers and completely customize them to their specific needs.
I went to Leindecker Racing Engines and applied 3 coats of high temp red ceramic paint and 3 coats of high temp clearcoat to my Merlin Big Block. I talked with Jason about our plans for the valve train and we will begin the work on Thursday. I am so excited!
I re-upholstered the dash pad and was terrified the entire time. It came out fantastic and was much easier than I had planned. Back in my comfort zone and expertise, I was also able to make a brand new wiring harness for the front end of the car from scratch and share the entire process with my daughter. I also took the inner fenders off and drilled out holes to run all of the wires from the cockpit to the engine and the front of the car so the engine bay will be clean and wire free. I ALWAYS wanted to do this to my car and took full advantage of the car being gutted.


August 6th: My wife was able to find the perfect fabric for me to re-upholster the dash pad. I fabbed up all of the new dash pieces and gauge mounts. I even painted them all to match the door panels I did a year ago. I started the wiring process and made a quick disconnect harness for every one of the gauge clusters, tach / shift lights, switch panel, and steering column. This will enable me to remove the dash and steering column in the future with no effort electrically. I also fabbed up two new brackets so I could move the fuse box and relay board / power buss / ground buss under the dash to clean up the engine compartment from wires. I love electric work. It's all about the details!
JULY 29th: I spent the afternoon with master engine builder Jason Leindecker at his machine shop. I cleaned all of the gasket areas and sanded the entire block to get it ready for paint. Jason took some measurements on the piston bore and made sure all of the cylinders were perfect in his cylinder hone machine. I love it when someone is as anal as I am. He must have measured each cylinder a dozen or more times while honing. Today was a big tease, I want to hear that 572 roar again.
JULY 28th: I cut up the new center dash piece to fit the digital dash data logger. I took my time and and made very small changes until finally getting the fit I was hoping for. It looks fantastic and was definitely worth the tedious fabrication. Can't wait to show you a picture. I also decided to re-upholster the top dash pad and re-paint the entire dash. This required even more disassembly. I hope my wife can find me the material I have in mind for the dash pad. I can't believe I opened up yet another can of work to complete. REMINDER - My car was complete and working perfectly back in June. They call us gearheads for a reason. I enjoy the process more than driving it.
JULY 24th: My daughter and I dropped the headers and exhaust off to get ceramic coated. There will be more to follow on this amazing process and the incredible company who excels at it. I also found a stock center dash piece online that used to house the air vents, climate controls, and radio. I was a little reluctant to start cutting up the one I have already customized that fits my gauge cluster, warning/arming lights, and Painless switch panel. I will be modifying the new one to fit all of the existing components plus the new data logger / digital dash. I really cant wait to begin this process as it looks really cool in my head and on paper. Lets hope I can get it on the first try.
JULY 20th: The 572 is completely torn down and undergoing machine work. Thankfully there was no further damage from the valve keeper breaking other than a bent intake valve. The piston and combustion chamber managed to survive un-hurt. The Turbo 400 was just sent to Rossler Transmissions for a complete look-over and a new aluminum drum. I have ripped apart the interior and wiring once again in order to make room for the new data logger and digital dash. There is so much more to do and to think my car was finished and running in May. When is enough ever enough? Hmmm....... That may just be the title of my next Shop talk article. More updates will follow.
JULY 8th: We welcome the newest sponsors to our family - Aeromotive Inc. and RPM Performance. We'll be featuring their products in upcoming issues and will show how they can help you.
JULY 7th: Since the engine and transmission are out of Big Red, I made the decision to re-paint and re-wire the engine bay and undercarriage to make it worthy of housing the new powerplant. I will also be installing a data logger, digital dash, and a completely new and much improved fuel system. I told you in my last Feature Car story that my wife gave me permission to release the Kraken. I am like a dog that just got released from its leash!


Comments